Excision Biopsy
Preparation, Procedure Steps, After Care and Followup
Preparation
- Goggles
- Sterile gloves
- Chlorhexidine (or other approved skin cleanser)
- Sterile gauze
- Skin marking pen
- Local anesthetic, syringe, needle (see chapter titled “Local Anesthetic“)
- #15 scalpel
- Laceration tray (needle holder, forceps, scissors, hemostat, drapes).
- Suture material (see chapter titled “Suturing Uncomplicated Lacerations“)
- Absorbent dressing such as Mepore
- Labeled specimen container with formalin
Procedure Steps
Step 1: Health history and physical exam
Assess the duration of time the lesion has been present, location, presence of infected tissue around planned biopsy site, allergies, bleeding disorders, and ensure the patient is aware that all biopsies result in a scar.
Assess for risk factors for poor wound healing:
• impaired nutritional status
• advanced age
• medications
• diabetes
• peripheral vascular disease
• autoimmune disease
• immunosuppression
• COPD
• CHF
• anemia
• smoking
• substance use
Step 2: Position patient in neutral position
To achieve the least noticeable final scar, the ellipse should be drawn parallel or within relaxed skin tension lines. Relaxed skin tension lines can be better visualized when the patient is positioned in an anatomically neutral position when the ellipse is being drawn.
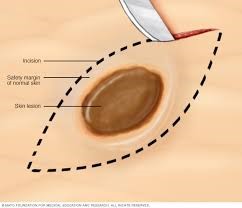
Step 3: Pre-mark incision site
Appropriate margins around the lesion must be defined before removal can be done. Benign lesions are typically removed with a 1 to 2 mm margin. Malignant lesions should be excised with a wider margin and referral to dermatology should be considered.
Marking the intended lesion is also helpful as it may temporarily be distorted following injection of the anesthetic.
When marking the site, pay attention to the skin tension lines and orientate the elliptical incision so that it is parallel to these lines. This allows the wound to close more easily and cosmetically than incisions done at right angles to skin tension lines.
The appropriate margins should be marked using a skin marking pen and then the ellipse drawn around this. Once the axis of the ellipse has been determined, the provider can mark the lines connecting the circle and the tips of the ellipse. The angles at each end should be about 30 degrees and the length-to-width ratio about 3:1 to 4:1.
Step 4: Cleanse the area with chlorhexidine or other approved skin cleanser
Wound cleansing reduces risk of sepsis to the wound site. Cleanse a wide area around the wound to prevent contamination of suture material and surgical instruments during the procedure.
Step 5: Anesthetize area using a field block technique
See the chapter titled “Local Anesthesia” for the full procedure. Using anesthetic with epinephrine will constrict blood vessels and decrease bleeding during the procedure. Avoid use of epinephrine in the digits, ears, and nose due to the risk of ischemia.
Step 6: Drape the site
Prepare an area measuring approximately 3 inches wide around the edges of the wound or planned incision.
Step 7: Make an elliptical incision
i) Hold the scalpel like a pencil with the tip perpendicular to the skin
ii) Begin the incision at one apex
Follow the marked incision line to the other apex. As the incision progresses, use more of the belly of the blade, and then raise it so that the tip is perpendicular to the skin as you reach the next apex.
iii) Avoid crosshatching the lines at the apices
iv) The incision should be about 3 to 4 times as long as it is wide with the corners at about 30 degrees.
v) Ensure the incision extends full-thickness
The end incision must extend through the entire thickness of the dermis and be deep enough to see subcutaneous tissue when the sample is removed. The full thickness incision does not need to be achieved on the first stroke and multiple strokes may be required.
Step 7: Grasp the dermis
Grasp the dermis with forceps and excise the tissue within the incision at the level of the subcutaneous fat with a scalpel or scissors. Take care not to crush the tissue as this will affect pathology results.
Step 8: Pull out the lesion and remove any remaining lesion wall
Ensure that the same amount of tissue is removed from the center as is from the apices.
Step 9: Undermine the subcutaneous plane
Using a scissor, undermine the subcutaneous plane beneath the dermis to allow the skin to glide together and reduce tension on the sutures:
a. Advance the closed scissors under the wound edge where the dermis meets the subcutaneous tissue
b. Quickly spread the scissors open
c. Continue this around the entire wound
Step 10: Close the incision
Approximate the wound edges using sutures. The horizontal mattress or vertical mattress sutures offer deep closure support and are recommended to prevent dead space and hematoma formation. See chapter titled “Suturing of Uncomplicated Lacerations” for full procedure.
Step 11: Apply dressing to incision site
Apply an occlusive dressing to facilitate a moist environment and speed wound healing. Occlusive dressings can be made by using a topical antibiotic ointment or petroleum jelly on the wound and then covering with non-adherent gauze and tape, or a dressing such as Mepore.
Step 12: Send specimen to lab
Ensure the specimen is sent to the lab in compliance with your jurisdiction’s policies and packaging requirements.
Video
Video
Aftercare
- Cover the wound with a thin layer of petroleum jelly or topical antibiotic ointment and a pressure dressing (i.e., non-stick gauze, adhesive tape).
- Keep the initial dressing in place for 24-48 hours to keep the wound clean and dry.
- Do not soak the wound, showering is acceptable.
- Wash the wound daily with mild soap and warm water.
- Monitor for signs of infection, dehiscence, severe pain, hematoma formation.
- Pain management options.
- Prophylactic antibiotics depending on health history and patient characteristics.
Patient Education
Follow-up
- Timeline for suture removal depends on site of excision.
- Inform patient of biopsy results.
Key Takeaways
- While rare, allergic reactions can occur with local anesthetics, so all patients should be assessed for previous history of allergy to any of the components of the chosen anesthetic.
- Children and older adults may be more sensitive to the effects of local anesthetics, especially lidocaine, therefore, it is important to do a thorough history prior to using a local anesthetic agent.
- Xylocaine with epinephrine must be avoided in areas where blood flow is minimized by the size and space: nose, penis, fingers, ear, toes, and skin flaps with minimal or compromised blood flow.
- Local Anesthetic System Toxicity (LAST) can occur when the serum levels of anesthetic agent exceed safe levels and can be caused by excessive amount of agent or injection directly into a blood vessel. Signs and symptoms include numbness of tongue and/or lips, metallic taste, tinnitus, dizziness, confusion, and in extreme cases, cardiovascular symptoms related to blood pressure and heart rate. LAST can be prevented by minimizing the amount of anesthetic agent used and careful aspiration when injecting to avoid directly accessing a blood vessel.
