Fishhook Removal
Preparation, Procedure Steps, After Care and Followup
Preparation
- PPE (gloves, goggles)The healthcare provider should be aware that the fishhook may come out with significant velocity.
- Cleaning solution
- Gauze
- Normal saline for irrigation
- 3-0 suture material (yank technique)
- 18-gauge or larger needle (needle cover technique)
- Pliers or other cutting device (advance and cut technique)
- Local anesthetic as needed (see chapter titled “Local Anesthesia” for full procedure)
Procedure Steps
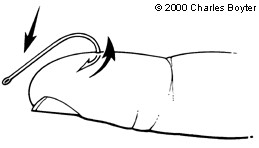
Retrograde Technique
Is the simplest of the removal techniques, but has the lowest success rate.
Works well for barbless and superficially embedded hooks.
Step 1: Apply downward pressure to the shank of the hook
This maneuver helps rotate the hook deeper and disengage the barb, if present, from the tissue.
Step 2: Back the hook out of the skin along the path of entry
Any resistance or catching of the barb during the procedure should alert the practitioner to stop an consider other removal methods.
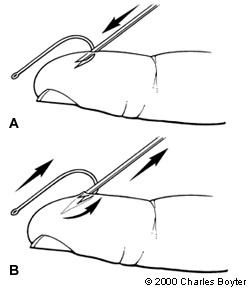
String-yank Technique
Modification of the retrograde technique. Commonly performed in the field and is thought to be less traumatic because it creates no new wounds and rarely requires anesthesia.
May be used to remove any size fishhook, but usually works best when removing small and medium size fishhooks.
This technique also works well for deeply embedded fishhooks, but cannot be executed on parts of the body that are not fixed (e.g., earlobe).
Step 1: Wrap a string, such as fishing line or suture material, around the midpoint of the bend in the fishhook with the free ends of the string held tightly
Step 2: Stabilize the involved skin area against a flat surface as the shank of the fishhook is depressed against the skin
Step 3: Depress the eye and/or distal portion of the shank of the hook, taking care to keep the shank parallel to the underlying skin
Step 4: Apply a firm, quick jerk parallel to the shank while continuing to exert pressure on the eye of the fishhook
A better grip on the string can be achieved by wrapping the ends around a tongue depressor.
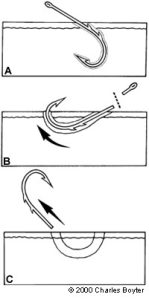
(A) Wrap a string around the midpoint of the bend in the fishhook. (B) Depress the shank of the fishhook against the skin. (C) Firmly and quickly pull on the string while continuing to apply pressure to the shank.
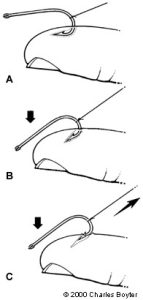
Needle Cover Technique
This technique works well for the removal of large hooks with single barbs, but is most effective when the point of the fishhook is superficially embedded and can be easily covered by the needle.
Step 1: Cleanse and anesthetize affected area
See chapter titled “Local Anesthesia” for full procedure.
Step 2: Advance an 18-gauge or larger needle along the entrance wound of the fishhook
Ensure the direction of needle insertion is parallel to the shank. The bevel should point toward the inside of the curve of the fishhook, enabling the needle opening to engage the barb.
Step 3: Advance the fishhook to disengage the barb, then pull and twist it so that the point enters the lumen of the needle
Step 4: Back out the fishhook (the same way as in the retrograde technique), taking care to move the needle along the track with the fishhook
(A) Advance an 18-gauge or larger-gauge needle along the fishhook until the needle opening covers the point. (B) The fishhook and needle are then removed at the same time.
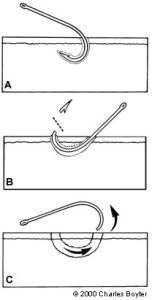
Advance and Cut Technique
This method is most effective when the point of the fishhook is located near the surface of the skin.
It involves two methods of removal: single-point fishhooks and multiple-barbed fishhooks.
Single-point fishhooks
Step 1: Cleanse and anesthetize affected area
See chapter titled “Local Anesthesia” for full procedure.
Step 2: Use pliers or needle driver to advance the point of the fishhook (including the entire barb) through the skin
Step 3: Cut off the point and barb with pliers or another cutting tool and back out the fishhook
(A) The fishhook is advanced through the skin. (B)The barb is then cut off and (C) the remaining hook is backed out through the entry wound.
Multiple-barbed fishhooks
Step 1: Cleanse and anesthetize affected area
See chapter titled “Local Anesthesia” for full procedure.
Step 2: Advance the fishhook
Step 3: Cut off the eye of the fishhook
Step 4: Pull the fishhook in the same direction as the point was advanced
(A) The fishhook is advanced through the skin. (B) The eye of the fishhook is then cut off and (C) the remaining portion of the fishhook is pulled through the exit wound created by advancing the point.
Video
Video
Aftercare
- After removal of the fishhook, the wound should be explored and irrigated for possible foreign bodies (e.g., bait).
- Leave the wound open, apply an antibiotic ointment and a simple dressing.
- Administer tetanus toxoid as per guidelines.
- Consider prophylactic antibiotic therapy for persons who are immunosuppressed or have poor wound healing (e.g., patients with diabetes mellitus or peripheral vascular disease).
- Prophylactic antibiotic therapy may also be considered for deeper wounds that involve the tendons, cartilage, or bone.
Patient Education
- Keep the wound clean and dry.
- Monitor for signs and symptoms of infection: wound tenderness, erythema greater than 1 cm from wound edge, wound purulence, and regional lymphangitis.
Follow-up
Patient should be advised to return to clinic if they develop signs of infection.
Key Takeaways
- There are numerous fishhook removal techniques available. The choice of technique should be based on location of injury and type of hook.
- Eye protection is required as hooks are often removed with high velocity.
- Cleanse the site before removal is attempted.
- Superficially embedded hooks may not require a local anesthetic if they can be removed with the retrograde or string-yank methods.
- More invasive techniques (needle cover, advance and cut) will require a local anesthetic or nerve block.
- The retrograde and string-yank techniques should be attempted first as they result in the least amount of tissue trauma.
- Multiple techniques might be required before the fishhook is successfully removed.
- Irrigate the site with normal saline after removal to flush away debris such as bait.
