Tick Removal
Preparation, Procedure Steps, After Care and Followup
Preparation
- Hemostat or tweezers
- Gloves (non-sterile)
- Chlorhexidine (or other approved skin cleanser)
Procedure Steps
Step 1: Health history and physical exam of the site
Step 2: Wash hands, don gloves
Step 3: Cleanse the area with chlorhexidine
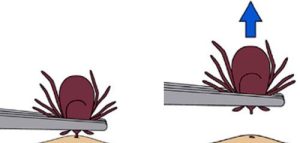
Step 4: Grasp the tick
Use a hemostat or tweezers to grasp the tick as close to the embedded site as possible. Avoid squeezing or crushing the tick.
Step 5: Remove the tick
Apply steady traction upward and perpendicular to the skin. Twisting counter clockwise may facilitate removal.
Do not twist the tick or use a jerking motion as this may cause the mouth-parts to break off and remain embedded in the skin.
Step 6: Assess site for remaining tick mouth-parts
Thoroughly clean the bite area with soap and water. If tick mouth parts are left behind, a biopsy or excision may be necessary.
Step 7: Dispose of the tick
Dispose of the tick by flushing it down the toilet, placing it in a sealed container, wrapping it tightly in paper, or putting it in rubbing alcohol. Never crush a tick with your fingers.
Aftercare
- Monitor for tick borne disease, review tick guidelines for the local area.
- Provide patient education on prevention:
- Examine yourself and pets for ticks
- Stay to the centre of hiking trails or paths
- Wear light-coloured clothing with long sleeves and pants to make it easier to see ticks crawling on your clothing
- Tuck clothing in where possible
- Use an appropriate tick repellent
- Launder clothing that has been worn outdoors
Patient Education
Printable
Follow-up
- As needed if signs and symptoms of infection or tick-borne disease develop.
Key Takeaways
- All embedded ticks must be removed.
- Prevention is key to preventing tick bites.
