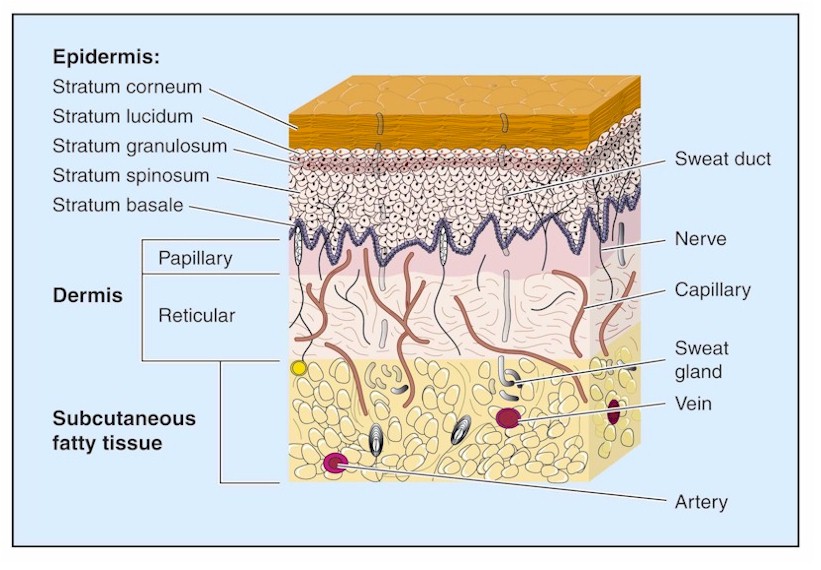
Local Anesthesia
Preparation, Procedure Steps, After Care and Followup
Preparation
- Goggles
- Sterile gloves
- Local anesthetic agent being used
- 5-ml syringe
- Needles: 18 gauge for drawing anesthetic agent from vial (if needed) and 25 or 27 gauge for infiltration into the skin
- Sterile saline or other approved skin cleanser
- Sterile gauze
- Sterile drape
Procedure Steps
Step 1: Health history and physical assessment
Focus on past operative experiences with LA, wound management, suturing, etc., and allergies.
Physical assessment:
-
- circulation, sensation and movement distal and proximal to the wound
- 2-point discrimination
- sharp/soft discrimination
- pulses
- capillary refill
- range of motion and strength against resistance of all body parts surrounding the wound site
- pain
Step 2: Set up equipment, wash hands, don gloves
Wound closure is a sterile procedure. All wounds are at risk for infection. Maintain universal precautions throughout procedure.
Step 3: Cleanse skin around operative site with chlorhexidine
Wound cleansing reduces the risk of sepsis to the wound site. Cleanse a wide area around the wound to prevent contamination of suture material and surgical instruments during the procedure.
Note that some antiseptics (i.e., chlorhexidine, iodine) are cytotoxic and damage fibroblasts essential to wound healing. The wound itself should be cleansed or debrided with sterile normal saline only. Alternative methods for wound debridement are below.
Wound irrigation and debridement can be painful for the patient and may be better tolerated after the wound is anesthetized.
(a) Irrigation: Use an 18-gauge catheter attached to a 30 mL syringe. 10 PSI of irrigating pressure is needed to dislodge contaminants and bacteria, yet not damage tissue.
(b) Scrubbing: Use a sponge or a brush to remove embedded debris. Avoid soaps or detergents.
(c) Debridement: Remove retained debris and devitalized tissue by surgical excision to improve wound healing time and prevent disfigurement. Do not introduce antiseptic solution directly into the wound.
Step 4: Drape the wound
Prepare an area measuring approximately 3 inches wide around the edges of the wound or planned incision.
Step 5: Choose appropriate LA
Providers should refer to physiology and pharmacology resources for further details about the different agents, strengths, and dosing guidelines.
(a) Xylocaine 1% or 2%
The maximum dose of Xylocaine 1% is 4.5 mg/kg (max 30 mL).
Xylocaine is the most frequently used LA agent as side effects or allergies tend to be rare.
Xylocaine has an immediate onset of action and a duration of action of approximately three hours.
It is important to keep note of the total LA dose used if a large area must be anesthetized.
(b) Xylocaine 1% or 2% with Epinephrine
Only Xylocaine 1% with epinephrine should be used for scalp lacerations. The vasoconstriction effects of epinephrine can reduce blood flow to the area, which makes for easier visualization of the wound and also allows for a larger dose of Xylocaine to be used since systemic absorption is reduced.
Xylocaine with epinephrine must be avoided in areas where blood flow is minimized by the size and space; such as the nose, penis, fingers, ear, toes and skin flaps with minimal or compromised blood flow.
Xylocaine with epinephrine is an alternative choice for scalp lacerations or other highly-vascular areas as the epinephrine can help reduce bleeding at the site.
Xylocaine with epinephrine should be avoided in grossly contaminated wounds because the vasoconstriction and reduced blood flow caused by the epinephrine could increase the risk of infection.
Step 6: Determine technique to be used
(a) Topical Anesthesia
Topical anesthesia can provide sufficient anesthesia for wound cleansing and ease discomfort associated with local infiltration of anesthesia prior to suturing, and reduce distortion of the wound caused by infiltration of LA.
Use of topical LA in children can reduce pain and anxiety prior to infiltration of LA (if required).
(i) Apply a gauze pad soaked in a facility approved LA (e.g. 2% Xylocaine) to the wound or operative site and leave in place for 30 minutes.
(ii) Loosely cover the pad with an occlusive dressing or plastic wrap to prevent spread to other tissues or accidental dislodgment of the pad.
(b) Infiltration Anesthesia
This technique should be avoided when the wound is grossly contaminated due to the risk of infection.
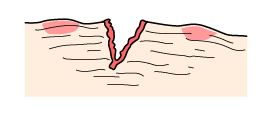
Local infiltration involves the injection of the LA at the wound margins and/or directly into the line of incision. Injection through the edges of the wound can be less painful than injection through adjacent intact epidermis. This technique should be avoided when the wound is grossly contaminated due to the risk of infection.
(i) Instill a few drops of anesthetic agent directly into the wound
An open wound can be gently “flooded” with a small amount of LA directly into the wound opening prior to introduction of the needle.
(ii) Place the needle directly into the exposed subcutaneous tissue
Start at one end of the laceration. Introduce the needle quickly through the wound margin rather than intact skin.
The face of the bevel should be facing down and the needle parallel to the surface of the skin.
Fully insert the needle to the hub. Injection of the anesthetic into the plane between the dermis and the subcutaneous tissue is less painful than direct dermal infiltration and offers less resistance.
(iii) Aspirate for blood
This will help reduce the risk of intravascular injection of the anesthetic agent. If blood is returned, withdraw the needle a few millimeters, reposition in the area to be infiltrated, and repeat this maneuver until no blood is aspirated.
(iv) Inject the LA
Inject a small amount of local anesthetic as you withdraw the needle.
Slow injection causes less discomfort as there is less distention of the surrounding tissue. Keeping the solution at slightly above body temperature (40° C) will also reduce discomfort.
(v) Continue to anesthetize adjacent areas
Continue to inject small volumes of anesthetic into adjacent areas until the entire region requiring anesthesia is infiltrated. Ensure subsequent injections are done through previously anesthetized skin to prevent additional pain from repeated insertion of the needle.
(c) Field Block
Field block involves injection of the anesthetic agent on all sides and deep to the wound site, avoiding injection of the lesion itself. It is useful in areas (e.g. the ear) where infiltration to the site itself is difficult. Field block is useful in wounds with gross contamination as the debris is not being further injected into the tissue when the LA is introduced.
(i) Draw an imaginary diamond around the lesion or laceration to be sutured. 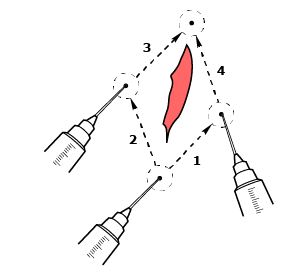
(ii) Insert the needle into the subcutaneous tissue through intact, clean skin and 1cm away from the margin of the lesion or wound site
Insertion of the needle 1 cm away allows for deep introduction of LA adjacent to the wound.
The needle should be inserted to approximately 2/3 of its length and along the “walls” as described above.
Injection of the anesthetic into the plane between the dermis and the subcutaneous tissue is less painful than direct dermal infiltration and offers less resistance.
(iii) Aspirate for blood
This will help reduce the risk of intravascular injection of the anesthetic agent. If blood is returned, withdraw the needle a few millimeters, reposition in the area to be infiltrated, and repeat this maneuver until no blood is aspirated.
(iv) Inject the LA
Slowly inject a small amount of local anesthetic as you withdraw the needle.
Slow injection causes less discomfort as there is less distention of the surrounding tissue. Keeping the solution at slightly above body temperature (40° C) will also reduce discomfort.
(v) Repeat previous step until LA has been injected along all sides of the diamond around the lesion or wound site.
If you must withdraw the needle to inject in an adjacent area, choose an area that had already been infiltrated with LA to reduce discomfort. Follow the diagram below for recommended injection sites.
Step 7: Test sensation
Wait until the pin prick is no longer detected by the patient before proceeding (usually in 3 to 5 minutes).
Video
Aftercare
Aftercare depends on the site of local anesthesia, amount of anesthetic used, and comorbid conditions. Specific wound aftercare depends upon the nature of the wound or injury and is not covered in this module.
Most patients who have received a local anesthetic can leave immediately after the procedure is completed. Notable exceptions:
- patients who have had anesthetic to the mouth or throat should be advised not to drink until their gag reflex has returned
- patients with a known or suspected cardiac arrhythmias should be observed and/or monitored with an EKG until the effects of the agent have worn off
Patient Education
Follow-up
Follow-up related to local anesthetic is not usually required. Patients should be advised to follow-up related to care of the wound itself including management of the site (e.g. cleansing, dressings, etc.), return to function of the affected area of the body, signs and symptoms of infection, suture removal, etc..
Key Takeaways
- While rare, allergic reactions can occur with local anesthetics, so all patients should be assessed for previous history of allergy to any of the components of the chosen anesthetic.
- Children and older adults may be more sensitive to the effects of local anesthetics, especially lidocaine, therefore, it is important to do a thorough history prior to using a local anesthetic agent.
- Xylocaine with epinephrine must be avoided in areas where blood flow is minimized by the size and space: nose, penis, fingers, ear, toes, and skin flaps with minimal or compromised blood flow.
- Local Anesthetic System Toxicity (LAST) can occur when the serum levels of anesthetic agent exceed safe levels and can be caused by excessive amount of agent or injection directly into a blood vessel. Signs and symptoms include numbness of tongue and/or lips, metallic taste, tinnitus, dizziness, confusion, and in extreme cases, cardiovascular symptoms related to blood pressure and heart rate. LAST can be prevented by minimizing the amount of anesthetic agent used and careful aspiration when injecting to avoid directly accessing a blood vessel.
