Staples for Wound Closure
Preparation, Procedure Steps, After Care and Followup
Preparation
- Sterile gloves
- Goggles
- Chlorhexidine (or other approved skin cleanser)
- Laceration tray (sterile gauze, waterproof drape, tissue forcep, needle holder, sterile scissors)
- Sterile normal saline
- Anesthetic such as Xylocaine 1% and/or 2% with or without epinephrine
- 10mL syringe with a 25-gauge needle
- Staple gun and staples
- Available in regular and wide staples
- Wide staples may be used in thicker skin
- Dressing (such as Mepore)
Procedure Steps
Step 1: Health history and physical assessment
Assess mechanism of injury and environment in which injury occurred, time of injury, site and type of wound, and medical history. Never close a wound that is more than 24 hours old.
Assess for risk factors for poor wound healing:
• impaired nutritional status
• advanced age
• medications
• diabetes
• peripheral vascular disease
• autoimmune disease
• immunosuppression
• COPD
• CHF
• anemia
• smoking
• substance use
Physical assessment:
• circulation, sensation and movement distal and proximal to the wound
• 2-point discrimination
• sharp/soft discrimination
• pulses
• capillary refill
• range of motion and strength against resistance of all body parts surrounding the wound site
• pain
Step 2: Set up equipment, wash hands, don gloves
Wound closure is a sterile procedure. All wounds are at risk for infection. Maintain universal precautions throughout procedure.
Step 3: Cleanse wound or skin of the operative site with normal saline
Wound cleansing reduces the risk of sepsis to the wound site. Cleanse a wide area around the wound to prevent contamination of suture material and surgical instruments during the procedure.
Wound irrigation and debridement can be painful for the patient and may be better tolerated after the wound is anesthetized.
Note that some antiseptics (i.e., chlorhexidine, iodine) are cytotoxic and damage fibroblasts essential to wound healing.
The wound itself should be cleansed or debrided with sterile normal saline only. Alternative methods for wound debridement are below.
Do not introduce antiseptic solution directly into the wound.
(a) Irrigation: Use an 18-gauge catheter attached to a 30 mL syringe. 10 PSI of irrigating pressure is needed to dislodge contaminants and bacteria, yet not damage tissue.
(b) Scrubbing: Use a sponge or a brush to remove embedded debris. Avoid soaps or detergents.
(c) Debridement: Remove retained debris and devitalized tissue by surgical excision to improve wound healing time and prevent disfigurement.
Step 4: Clip hair on surrounding skin surface
Hair surrounding the wound should be clipped rather than shaved to prevent further trauma to the skin.Do not shave the hair surrounding the wound
Step 5: Drape the wound
Prepare an area measuring approximately 3 inches wide around the edges of the wound or planned incision.
Step 6: Anesthetize the wound
See chapter titled “Local Anesthesia “Local Anesthesia” for full procedure.
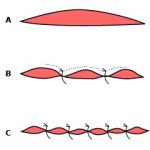
Step 7: Approximate and evert wound edges
Have an assistant evert and reapproximate skin edges. The stapler has a tendency to invert the wound edges impacting cosmetic appearance of the scar.
Step 8: Begin at one end of the laceration
Closing a wound by starting in the middle can lead to unwanted bunching of tissue between staples.
Step 9: Place staples into skin
Place stapler perpendicular to the wound. Gently hold stapler against the skin surface. Take care not to indent the skin.
Press down the handle to place the staple into the skin. Release the handle to disengage the staple. When properly placed, the crossbar of the staple is elevated a few millimeters above the skin surface to allow for swelling of the tissue.
Space staples approximately 0.5 to 1 cm apart.
Step 10: Assess tetanus status
A tetanus booster dose is required if the patient has not had a tetanus booster in the last 10 years. The combined preparation of tetanus and diphtheria toxoid formulated for adults (Td) is preferred.
If the patient has not received pertussis since childhood, then tetanus, diphtheria, pertussis (TdP) should be given. If the wound is excessively dirty, tetanus immune globulin should also be given. See Tetanus immune globulin in the Canadian immunization guide (recent edition) for further information.
Step 11: Consider prophylactic antibiotics
Prophylactic antibiotics, such as amoxicillin-clavulanate or doxycycline (Jensen, Regier, & Kosar, 2017), should be prescribed if the wound is:
• more than six hours old
• the result of human or cat bites
• a crushing wound
• grossly contaminated
• bone/joint involvement
• patient is immunocompromised
Video
Aftercare
A dressing may be applied initially if the stapled wound continues to ooze, when pressure is required to achieve hemostasis, or when the wound is at risk for gross contamination. Scalp lacerations may be left open to the air.
Patient Education
- Take care not to re-injure the anesthetized area.
- Keep dressing in place for first 24-48 hours then leave the wound open to air.
- Keep the wound clean and dry for the first 24-48 hours.
- Do not soak wound, showering is acceptable.
- Monitor for signs and symptoms of infection: wound tenderness, erythema greater than 1 cm from wound edge, wound purulence, wound dehiscence, and regional lymphangitis.
- Pain management options.
Printable
Follow-up
Schedule a 48-hour wound check as secondary wound infections typically occur 24-72 hours after the initial injury. The timing for staple removal is the same to that as for sutures. Alternating staples should be removed to assess for wound dehiscence.
REMOVAL SUGGESTIONS |
|
| Face | 3-5 days |
| Scalp, arms | 7-10 days |
| Trunk, legs, hands, feet | 10-14 days |
| Palms of hands, soles of feet | 14-21 days |
