8 Equipment Used in Compounding
Compounding equipment plays a critical role in ensuring the accuracy, safety, and quality of non-sterile preparations. Pharmacy personnel must be familiar with a wide range of tools, each designed to support specific tasks such as measuring, mixing, packaging, and cleaning. The appropriate use of equipment not only promotes efficiency and consistency but also upholds compliance with professional standards. Understanding the function, proper handling, and limitations of each tool is fundamental to maintaining best practices in compounding. Pharmacy professionals must also develop the technical skills necessary to select, calibrate, and operate this equipment accurately in order to support high-quality patient care.
Categories of Compounding Equipment
- Measuring Equipment
- Mixing & Blending Tools
- Compounding Equipment for Specific Dosage form
- Packaging Equipment
- Cleaning & Safety Tools
Measuring Equipment
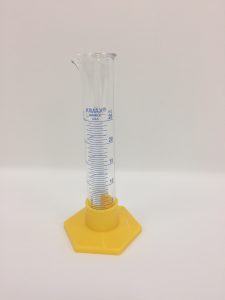
1. Graduated Cylinders
- Used to measure volume of a liquid accurately.
- Most common sizes in a pharmacy are 10ml, 25ml, 50ml, 100ml
- Being able to read a graduated cylinder accurately is a VERY important skill and should be mastered before doing any compounding
- How to Use:
-
- Graduate cylinder must be on a flat surface
- Eye position is level to the surface of the liquid
- Read volume at the bottom of the meniscus
- Read the numbered line below the meniscus. Add the incremental measurements up to the last mark below the meniscus
- Once you have documented your measurement, keep reading past your meniscus up to the next gradation to ensure you are using the correct sub-gradation…your count should match the next gradation
- Smallest amount that can be measured in the graduate is 20% of the maximum volume
- For example 10ml graduate -2 ml minimum, 100ml graduate – 20ml minimum
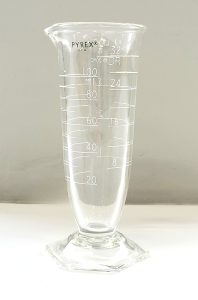
2. Conical Cylinder
- Conical cylinder are used for measuring and mixing in the same device
- They are characterized by a conical shape with graduated markings on the side for easy and accurate volume measurement
- Less accurate than a graduated cylinder.
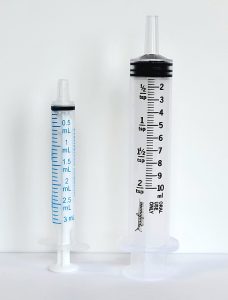
3. Syringes
- Used for small volume liquid measurement.
- Same minimum measurable amount allowed, 20% of maximum volume
4. Pipettes:
- Measures and transfers small liquid volumes
- 3 main types:
- Volumetric Pipettes – Delivers a precise fixed volume.
- Graduated Pipettes – Measures varying liquid volumes.
- Micropipettes – Used for very small volumes (µL range).
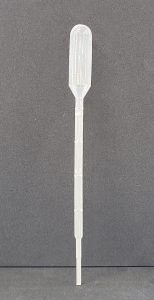
5. Droppers
-
May be used to measure ingredients in compounding and may be used to deliver small doses of liquid medication (< 1 mL to the patient)
-
Size of a drop of any liquid varies with differences in droppers and with viscosity, surface tension, and density of the liquid as well as angle of the dropper, pressure on the dropper, size of drug.
-
To maximize accuracy in measuring ingredients/doses, the dropper must be calibrated with the intended liquid

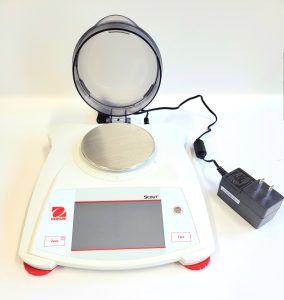
6. Weighing Scales & Balances
Electronic scale:
- The main way to measure weight in compounding is by using an electronic weigh scale
- This has a high level of accuracy when used correctly
- Must be calibrated regularly to ensure accuracy
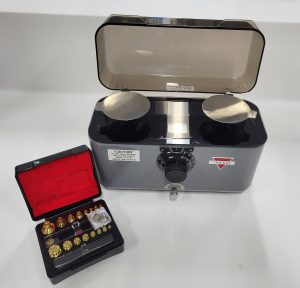
Class A prescription balance (Torsion):
- A traditional device used in pharmacies
- Not commonly used any more because time consuming and less accurate
Mixing & Blending Tools
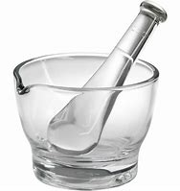
1. Mortar & Pestle
A mortar and pestle is an essential tool in pharmacy compounding, used for triturating (grinding), mixing, and blending powders, semi-solids, and pastes. The material of the mortar and pestle determines its effectiveness for specific compounds based on porosity, hardness, and reactivity. There are 4 main types of mortar and pestles used, glass, ceramic and Wedgewood and Porcelain. They also come in a variety of sizes (2 ounces to 32 ounces)
- Glass mortar & pestle:
- Made of smooth, non-porous glass
- Transparent, allowing for visibility of the mixture
- Ideal for mixing liquids, creams and pastes
- Not ideal for making emulsions, because it is difficult to get enough shearing action
- It is easy to clean and does not retain odors or stains
- Wedgewood:
- Made from unglazed porcelain with a rough interior
- It is durable and abrasive, making it excellent for grinding
- Used to grind crystals and larger particles into fine powders
- Also used for crushing hard powders or tablets, to reduce particle size
- It can be difficult to clean and can absorb liquids, leading to contamination or staining
- Not suitable for oily or staining compounds
- Hard rubber, silicone or plastic spatulas preferred when using Wedgewood to avoid scratching

Important Considerations for Choosing Mortars:
Checklist: Choosing and Maintaining Mortars and Pestles (Glass, Wedgewood, Porcelain, Ceramic)
1. Choose the Right Material for the Task
🔹 Glass
-
- ✔ Best for liquids, suspensions, and volatile or colored substances.
- ✔ Non-porous — easy to clean and doesn’t absorb ingredients.
- ✘ Fragile — not suitable for grinding hard solids.
- ✘ May slip on the work surface — use with a rubber mat for stability.
🔹 Porcelain
-
- ✔ Suitable for triturating soft powders and blending.
- ✔ Moderately rough surface — good for particle size reduction.
- ✘ Porous — can absorb stains, odors, or active ingredients.
- ✘ Not ideal for liquids or potent substances.
🔹 Wedgewood (Unglazed Ceramic)
-
- ✔ Best choice for hard crystalline solids and powder trituration.
- ✔ Very rough surface allows effective grinding and blending.
- ✘ Highly porous — not suitable for liquids, dyes, or potent drugs.
- ✘ Requires thorough cleaning to prevent residue buildup.
🔹 Ceramic (Glazed)
-
- ✔ Can be used for general compounding where a smoother surface is preferred.
- ✔ Less porous than unglazed types but still requires careful cleaning.
- ✘ May not provide the same grinding efficiency as Wedgewood.
2. Match Mortar Type to Preparation Type
| Preparation Type | Recommended Mortar |
| Liquid or semi-solid mixes | Glass |
| Soft powders, simple blends | Porcelain or Ceramic (glazed) |
| Hard crystals, triturates | Wedgewood |
| Colored or volatile materials | Glass |
3. Minimize Cross-Contamination Risk
-
- Avoid reusing porous mortars (Wedgewood, Porcelain) for:
- Potent APIs
- Hormones
- Chemotherapy drugs
- Consider dedicated tools or disposable alternatives for hazardous materials.
- Use glass for easier decontamination when cross-contamination risk is high.
- Avoid reusing porous mortars (Wedgewood, Porcelain) for:
4. Inspect for Damage and Residue
-
- Regularly check for:
- Cracks or chips (especially in ceramic/porcelain).
- Caked-on residue in rough surfaces (Wedgewood/porcelain).
- Surface wear that affects grinding performance.
- Discard damaged equipment immediately to maintain safety and accuracy.
- Regularly check for:
5. Clean Properly After Each Use
General Cleaning Steps:
-
- Remove visible residue with a dry spatula or cloth.
- Wash with warm water and mild detergent:
- Use a brush for rough surfaces (Wedgewood, porcelain).
- Rinse thoroughly to remove all cleaning agents.
- Air dry or use a lint-free towel.
- Inspect for remaining particles, especially in porous mortars.
Note: Porous mortars may retain stains or odors — consider replacing if thorough cleaning is not effective.
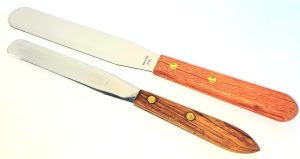
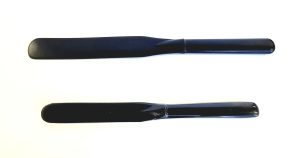
2. Spatulas
Spatulas are used for mixing, transferring and levigating powders, creams, ointments and pastes.
Important when using a spatula that you do not touch the blade with your hands.
- Metal spatula:
- Used for levigating & transferring ingredients.
- Small (6 inches or less) are preferred when handling dry chemicals
- Larger (6 inches +) preferred for large amounts of ointments or creams
- Not suitable for acidic compounds
- Plastic spatula:
- Non-reactive, ideal for sensitive or acidic compounds.
- Rubber spatula:
- Used for scraping mixtures.
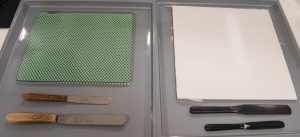
3. Ointment Slab & Pad
An ointment slab or pad is used to provide a hard, smooth surface for mixing creams and ointments.
- Glass or Porcelain Ointment Slab:
- Non porous, non absorbent surface
- Best practice to have something underneath to prevent slippage
- Ointment Pad:
- Disposable sheets of Parchment paper
- Quick clean up
- Can absorb liquid, so not ideal for creams, but works well for ointments
4. Weigh boats and weigh papers
- Holds powders or small solids to prevent contamination.
- Must use a large enough weigh boat or paper to prevent overflow or leakage
- Should be labelled during compounding, so the product in/on can be verified

5. Electronic Mixing Equipment
Using automatic mixing equipment can provide more uniform and efficient compounding. Examples include:
- Electronic Mortar & Pestle (EMP) – Automates trituration and blending.
- Ointment Mill – Reduces particle size for smooth, even-textured creams and ointments.
- Homogenizer – Ensures uniform emulsions and suspensions.
- Magnetic Stirrer – Used for continuous stirring of solutions.
Compounding Equipment for Specific Dosage forms:
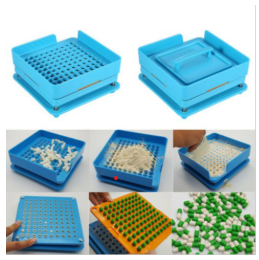
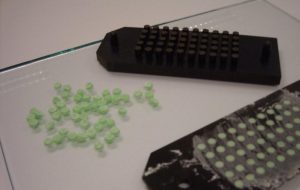
1. Capsule Filling Equipment
- Used for filling empty gelatin or vegetable capsules with powdered drugs.
- Types:
- Manual Capsule Filling Machine – Used in small-scale compounding.
- Automatic Capsule Filling Machine – Used in high-volume production.
- Ensures uniform drug distribution in each capsule.
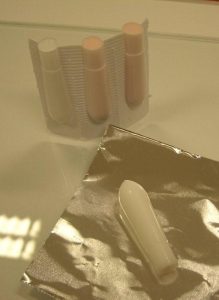
2. Suppository & Troche Molds
- Used to shape and solidify compounded suppositories and lozenges.
- Types:
- Plastic or Metal Suppository Molds – Forms rectal, vaginal, or urethral suppositories.
- Troche Molds – Creates medicated lozenges, lollipops, etc. for buccal absorption.
3. Molds & Punches
- Used to prepare compressed tablets, chewable forms
Packaging Equipment
1. Tube Fillers & Pumps
- Used for filling creams, gels, and pastes into tubes.
2. Blister Packaging & Vials
- Used for protecting capsules & tablets.
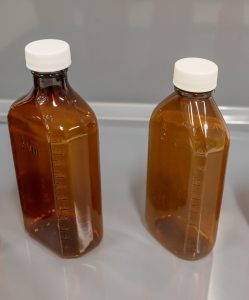
3. Amber Bottles (Prescription Ovals) & Plastic Containers (Ointment Pots)
- Protects light-sensitive medications.
- Ensures proper storage & dispensing.
- Prescription ovals are not accurate for measurement, but can be pre-calibrated to the exact volume required, ensuring accuracy.
Cleaning & Safety Equipment
1. Personal Protective Equipment (PPE)
- Gloves, masks, goggles, lab coats.
- Prevents contamination & exposure to hazardous materials.
2. Cleaning Equipment
- Must look at ingredients used for specific cleaning requirements
- Alcohol wipes, disinfectants, and cleaning brushes for maintaining equipment hygiene.
- Prevents cross-contamination.
- Regularly clean equipment surfaces before and after use.
3. Ventilation & Fume Hoods
- Required for handling volatile or hazardous ingredients.
- Ensures compounder safety & compliance.
Mastering the selection and correct use of compounding equipment is an essential competency for pharmacy technicians. Each category of equipment—from precise measuring tools like graduated cylinders and syringes, to mixing aids like mortars and ointment slabs, to packaging devices and personal protective gear—contributes to the accuracy, consistency, and safety of compounded preparations.
